-details-webp.webp)
Website migration is a complex operation where your website undergoes significant changes — anything from switching platforms to changing domains. Why should this matter to you? Because mishandling it could tank your search engine optimization (SEO), disrupt user experience, and create technical chaos.
But done right, migration can refresh your website’s performance and even future-proof your online presence. Let’s break it all down step by step, starting with preparation, the actual migration process, and some post-migration steps to keep that website shining in the best of light.
Pre-Migration Steps
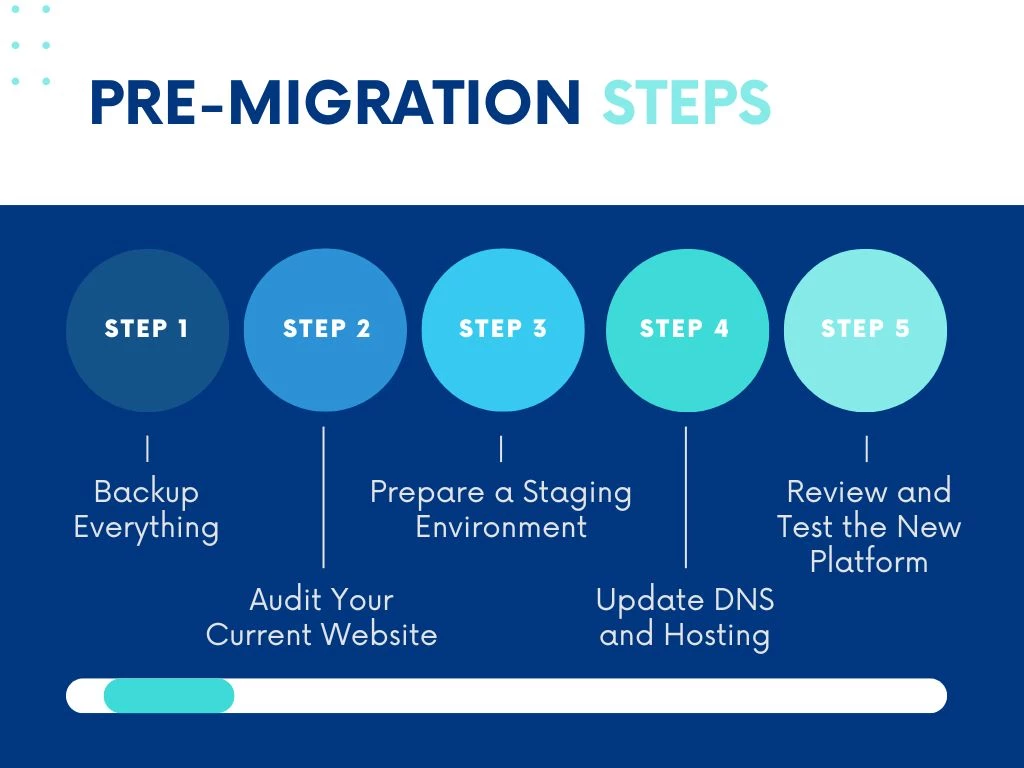
Source: Frosina Stojchevska, Pre-Migration Steps, Canva.com, accessed December 13, 2024
Preparation is everything when it comes to website migration. Think of this phase as packing your digital suitcase — ensuring everything is organized, accounted for, and ready to move seamlessly.
- Backup everything
- Audit your current website
- Prepare a staging environment
- Update DNS and hosting
- Review and test the new platform
1. Backup Everything
Think of backup as your safety net — something you hope never to use but would be lost without. Backing up your entire website, from context to databases, ensures you have a reliable fallback in case something goes wrong. For example, a software-as-a-service (SaaS) company moving its website might inadvertently lose user-generated content or transaction records during the migration process.
Tools like UpdraftPlus and BackupBuddy for WordPress websites, or your hosting provider’s built-in backup system are ideal for creating a full snapshot of your site. And don’t forget to double-check your backup to ensure it’s complete before proceeding.
2. Audit Your Current Website
Before packing up, you need a full inventory of what’s on your site. An audit gives you insight into what’s working well and what isn’t. Use tools like Google Analytics and Screaming Frog to identify top-performing pages, ones with broken links, and areas for improvement. For instance, if your Contact Us page consistently drives leads, ensure it transitions seamlessly.
On the flip side, this is a great time to prune outdated or underperforming content, like blogs with low traffic or irrelevant service pages. It’s like decluttering your digital home before you move.
3. Prepare a Staging Environment
A staging environment is your testing sandbox — a replica of your live website where you can experiment without affecting your users. For example, if you’re transitioning from WordPress to Drupal, a staging site lets you test how your content management workflows adapt to the new system. Platforms like WP Stagecoach or Pantheon are excellent for setting up these test environments.
Run tests for responsiveness, mobile-friendliness, and loading speed to ensure your new platform meets moder user expectations.
4. Update DNS and Hosting
Your domain name system (DNS) settings are like the GPS directing visitors to your site. If you’re moving to a new hosting provider or server, this step is critical. For example, if you’re upgrading to a managed hosting solution for better performance, ensure you update your DNS records promptly to minimize downtime.
Timing is everything — DNS updates can take up to 48 hours to propagate globally, so plan this step when user traffic is at its lowest, typically late at night or on weekends.
5. Review and Test the New Platform
Imagine moving into a new house and finding the doors don’t lock or the light doesn’t work. That’s what skipping this step feels like in website migration. Test all functionalities on the new platform, including contact forms, payment gateways, and pop-ups.
For instance, if you’re migrating an eCommerce site from Magento to Shopify, ensure that your product pages, checkout process, and third-party apps like shipping calculators work flawlessly. User experience matters here — any website issues could cost you traffic and sales.
Migration Steps
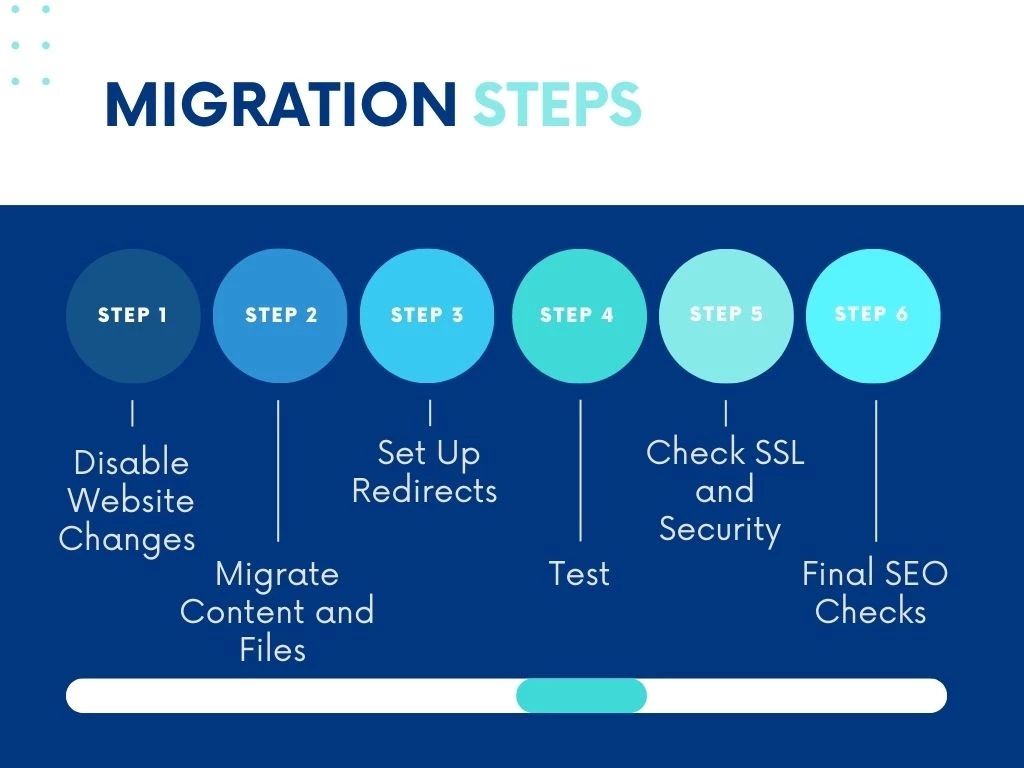
This is where the magic (and heavy lifting) happens. With precision and care, you’ll transfer your website’s assets, ensure everything is in its rightful place, and test like your online reputation depends on it — because it does.
- Disable website changes
- Migrate content and files
- Set up redirects
- Test
- Check SSL and security
- Final SEO checks
1. Disable Website Changes
Website changes during migration can lead to chaos. Imagine a new blog post or a product listing going live on your current site while you’re migrating. This creates a sync issue where some changes might not make it to the new platform. Disable updates and inform your team to put all content updates, campaigns, or edits on hold until the migration is complete.
2. Migrate Content and Files
The actual migration is where you’ll move all your website’s data, from text and images to back-end files and configurations. Double-check that your SEO metadata, like page titles and descriptions, are transferred correctly.
For instance, an eCommerce store migrating its product pages must ensure that product images, descriptions, and customer reviews appear intact on the new platform. Missing content could cost you valuable SEO rankings and user trust.
3. Set Up Redirects
Redirects ensure users and search engines find your content even after URLs change. A well-mapped redirect plan prevents the dreaded 404 Page Not Found errors that can frustrate users and tank your SEO.
For example, if your ‘/services’ page moves to ‘/our-services’, a 301 redirect tells Google and users where to go. You can use tools like Yoast SEO or Redirect Manager to automate this process. For larger sites, a manual redirect plan might be needed — especially if you’re rebranding or restructuring URLs.
4. Test
Thorough testing is non-negotiable. Test every corner of your website, from navigation menus and forms to third-party integration like email marketing platforms. For example, if your contact form no longer sends emails post-migration, potential leads are as good as lost.
Also, test on multiple devices — desktop, mobile, and tablet — to ensure the site displays and functions properly. Don’t forget to simulate high traffic to see how your new hosting handles the load.
5. Check SSL and Security
A secure socket layer (SSL) certificate is critical not only for data security but also for SEO. Once your site is migrated, reconfigure or reinstall your SSL certificate to ensure encrypted connections for your users. For instance, a Not Secure warning in browsers can scare off potential customers.
Your hosting provider’s SSL services make this step easier. Additionally, run security scans to check for vulnerabilities in your new environment.
6. Final SEO Checks
SEO continuity is the backbone of a successful migration. Commit to SEO best practices, such as running an SEO audit, checking for missing metadata, duplicate content, or broken links. For instance, a blog that previously ranked top for digital marketing tips should retain its optimized keywords, schema markup, and internal links. Address any gaps before the site goes live to avoid traffic dips.
Post-Migration Steps
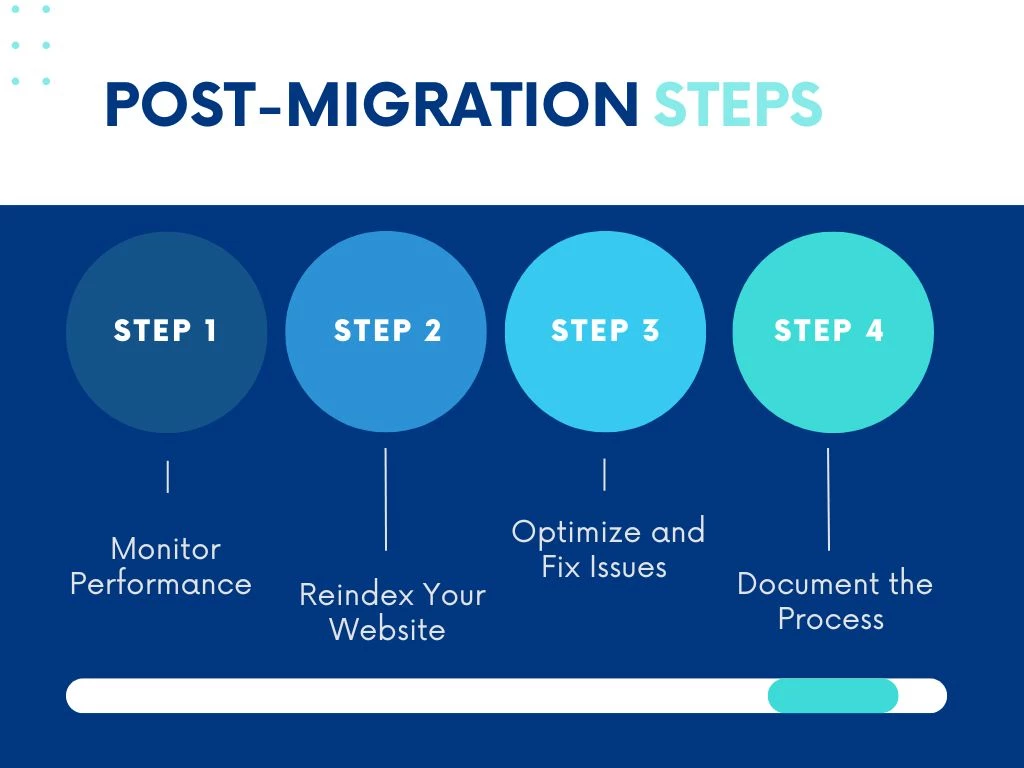
The move might be done, but the work isn’t over. Post-migration is all about fine-tuning, monitoring, and making sure your new website is running smoother than a freshly waxed surfboard.
1. Monitor Performance
Your website might look perfect, but data will tell the real story. Monitor critical metrics including traffic patterns, bounce rates, and average session durations. For instance, if a key page that used to see hundreds of visits per day suddenly drops to near zero, it could indicate a deeper issue like broken link or incorrect redirect.
In addition to tracking user behavior, assess technical performance. If load times increase after migration, visitors may abandon your site, hurting both SEO and sales. Regular monitoring for the first month of post-migration can help identify and fix small glitches before they spiral into bigger problems, ensuring your website stays reliable and competitive.
2. Reindex Your Website
A newly migrated website is like a brand-new store on a busy street — it needs a clear sign to guide visitors in. Submitting your updated sitemap to Google Search Console is like putting up that sign, ensuring search engines quickly find and index your updated pages.
For example, if your new URL structure is drastically different, reindexing will help search engines understand the changes, preserving your hard-earned SEO rankings. Additionally, leverage the URL Inspection tool in Search Console to submit high-priority pages manually. This can speed up the indexing process for key pages, such as your homepage or landing pages for major campaigns.
3. Optimize and Fix Issues
No website migration is perfect, so be prepared for surprises. Common post-migration issues include broken images, incomplete content transfers, and poorly functioning buttons. For example, an eCommerce site might find that product images didn’t load properly, leading to subpar shopping experience.
Optimization doesn’t stop at fixes. Take this opportunity to fine-tune your site for speed and functionality. Compress large images, minify CSS and JavaScript files, and enable caching to improve load times. This ensures your website performs well under heavy traffic.
4. Document the Process
Documenting the migration process is like creating a roadmap for future success. Record every step, including the tools and platforms used, challenges encountered, and solutions implemented. For example, if DNS propagation took longer than expected or a specific plugin didn’t function properly, note these details to inform future decisions.
This documentation can serve as a playbook for your team or any external developers you work with in the future. It’s not just technical exercise — it’s a business practice that ensures smoother transitions in the future.
Website Migration: The Bottom Line
Website migration is more than just a technical process — it’s a business-critical move that impacts your digital presence, SEO, and user experience. Done right, it’s an opportunity to modernize your platform, but done poorly, it can lead to lost traffic, diminished visibility, and a tarnished online reputation.
The key to success lies in meticulous planning, rigorous testing, and ongoing post-launch monitoring. Whether you’re migrating to a new content management system (CMS), rebranding, changing a website builder, or switching hosting providers, every step must prioritize preserving the elements that drive your online success.
To ensure a seamless migration, consider collaborating with an experienced SEO agency. These experts can help you plan, execute, and monitor every step of the process, prioritizing the preservation of critical SEO elements like rankings, metadata, and backlinks. Partnering with the right SEO agency not only safeguards your current success but also positions your website for sustainable growth.

Our team ranks agencies worldwide to help you find a qualified partner. Visit our Agency Directory for the top SEO agencies, as well as:
- Top SEO Agencies in Austin
- Top Content Marketing Agencies
- Top UI/UX Design Agencies
- Top Social Media Marketing Agencies
- Top eCommerce Marketing Agencies
Website Migration FAQs
1. Does migrating a website impact SEO?
Yes, but not always negatively. A well-planned migration can preserve or even improve your SEO. However, a sloppy one can lead to ranking drops, lost traffic, and penalties.
2. How long does a website migration take?
The duration of a website migration depends on its complexity. A straightforward migration, like switching hosting providers, can take a few days. However, a migration involving platform changes, URL restructuring, or rebranding may take weeks or even months. Always allocate time for pre-migration audits and post-migration testing.
3. What are the most common mistakes during website migration?
Common mistakes include failing to back up the old site, neglecting to test redirects, overlooking mobile optimization, and ignoring SEO elements. Another frequent issue is not informing search engines of the migration, which can lead to indexing problems.
4. How soon will I see results after website migration?
The timeline for seeing results varies. You may notice temporary dips in traffic or rankings, but these typically stabilize within a few weeks. It can take a month or more for search engines to fully crawl and index your site. Regular audits and optimization help speed up recovery.